How To Simply Generate A Sequence
In the first two parts of this tutorial series you learned how to create arbitrary waveforms using the Wave Composer. Now that you have created your waveforms, this tutorial will explain how to create and generate sequences and advance sequences.
To begin, in the ArbConnection Panel Bar, Click on the Arbitrary/Sequence panel. The Arbitrary/Sequence panel should open as shown in figure 1 below.
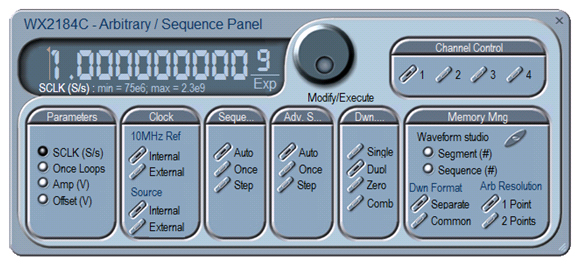 Figure 1 - The Arbitrary/Sequence Panel
1. The Arbitrary/Sequence Panel
Parameters
The SCLK (Sample Clock) provides access to programming the value of the sample clock frequency. The sample clock setting affects the waveform generator in arbitrary mode only. It is programmed in units of S/s (samples per second).
Clock
The 10MHz Ref controls toggle between an internal and external references. The default setting is internal, which provides frequency accuracy of 1ppm (points per million). If such accuracy is not sufficient for your application, click on the external option, but make sure that a reference source is applied to the rear panel connector.
The Source control toggles between internal and external sample clock inputs. The internal is the default setting. When you select the external sample clock option, make sure an appropriate signal is connected to the external sample clock connector, on the rear panel.
Sequence/Advance Sequence
The Sequence Advance Mode group provides control over advance modes for the sequence generator. Advance options are: Auto, Once, Step. Refer to your waveform generator user manual to find out more about when and how to use these advance modes. You should be careful while selecting modes, because it is possible to cause a settings conflict. For example, if you select the Single option before you modified the run mode to Triggered.
Download method
The Download Method group allows the user to define how the arbitrary waveform is downloaded to the unit memory (Available only on the WX 4 channel units). The output channels of the unit are arranged in pairs, meaning that each two channels share a single memory block of 32Mpoints (64Mpoints optional). The channel pair memory block is divided in such a way that the individual channel’s memory blocks (16Mpoints per channel in standard configuration) are interleaved in blocks of 16 points.
- Single - Waveform data is downloaded to the flash drive and then written to the selected channel memory.
- Duplicate - The same waveform data is downloaded to both channels of a channel pair.
- Zeroed - The waveform data is downloaded to the selected channel. A DC waveform (zeroes) is downloaded to the selected channel pair.
- Combined - In this mode the user has full control so waveform data must be arranged correctly. Waveform is downloaded to the selected channel pair. Waveform data must be arranged in accordance to memory limitations.
Refer to your waveform generator user manual to find out more on the various download methods.
Memory management
Use the Waveform Studio to program and manage the segments and sequences. This is explained in more details in the following paragraphs. The segment and sequence parameters provide access to the active segment and sequence for each channel respectively. The “Dwn Format” and “Arb Resolution”, control the downloading method to the digital memory when this option is available. For more information on downloading digital data refer to your waveform generator user manual.
2. Using the Waveform Studio
To open the Waveform Studio click on the Waveform Studio button in the Arbitrary/Sequence panel. The waveform Studio is shown in figure 2 below and has three tables:
- Segment Table.
- Sequence Table.
- Advance-Sequence Table (only in WX series Units).
To access one of the tables simply click on the table area and it will be highlighted in white.
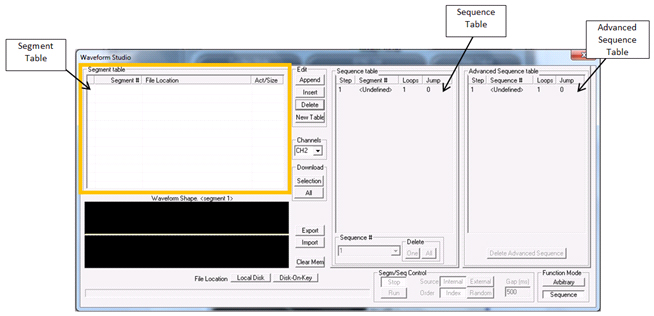 Figure 2 – The Waveform Studio
2.1 The Segment Table
The Segment Table lists all the segments that have already been downloaded or mapped into the unit’s arbitrary memory. From here you may also download waveform files that were previously stored on the computer (for example use files created using the wave composer). The table shows the segment number and its associated file name and location, length in points, and its download status (Free, Mapped, Loaded).
Description of the various buttons in the Segment Table:
● Append – adds segment number at the end of the table.
● Insert – adds a segment above a highlighted segment line.
● Delete – removes a highlighted segment.
● New Table – Resets the segment table.
- Channels – selects between channels. Shows the segment table, sequence table and advance sequence table for the selected channel/channel pair.
- Download
● Selection – downloads the highlighted segments only to the waveform generator’s memory.
● All – downloads the complete table to the waveform generator’s memory.
- Export – Enables the user to save the segment table.
- Import – Enables the user to open a segment table.
- Clear Mem – wipes out the entire memory and clears the table for fresh settings.
- Function Mode
● Arbitrary – Sets the unit to Arbitrary function mode
● Sequence – Sets the unit to Sequence function mode
2.2 The Sequence Table
Using the Sequence table you can link and loop the segments shown in the segment table to create one long and complex scenarios. The Sequence Table is demonstrated below. To access the Sequence table, click anywhere on the Sequence Table area.
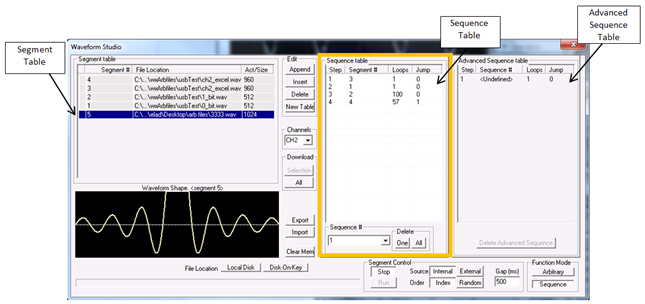
Figure 3 - The Sequence Table
There are five major elements that you should consider while programming a sequence table:
- Step - Defines an index array for the sequence generator.
- Segment - Associates waveform segments with steps. You can use different segments for different steps or you can use the same segment for a number of steps.
- Loops – Defines how many times the segment will loop for the selected step.
- Jump – When set to 0, the sequence will advance through the list automatically until a segment that is flagged 1 is encountered. When 1 is encountered, the generator will idle on this segment until an external trigger is applied.
Once you have finished programming the Sequence table press the download button to download it to the unit. You can create another sequence table by changing the sequence number on the “sequence #” field. Enter the new sequence number, press Enter and a new sequence table will appear. You can create several sequences.
Note
In the WX series units, for a sequence to be legal, it must have at least 3 steps.
2.3 Advance-Sequence table
Advanced sequencing is an extension of the sequencer functionality. It describes a function that is capable of sequencing complete sequences and therefore creating very complex scenarios that otherwise would have required extremely large memory banks. For example, a sequence of initiating communication between ground station and airborne vehicle requires repetition of a certain sequence of transmissions, and then the message itself is embedded in a separate transmission sequence. Such a complex communication scheme is easily achieved with the advanced sequencing technique that has been employed by our WX series. To access the Advanced-Sequence table, click anywhere on the Advanced-Sequence Table area.
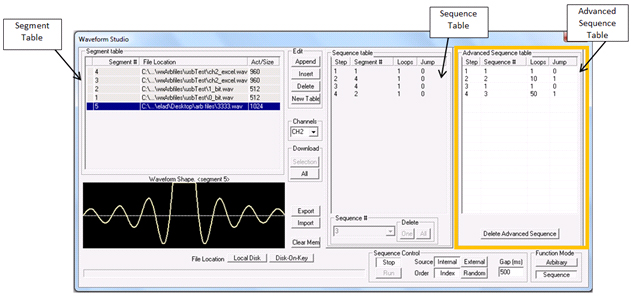
Figure 4 - The Advanced Sequence Table
The way of forming an advanced sequence table, is the same as forming a normal sequence table. In fact the keys you use to form an advanced-sequence table are the same keys as of the regular sequence table. Note that in order to form an advanced sequence table, you’ll need at least two sequences stored in the memory.
Note
Once you have finished creating you waveforms and sequences and have turned on the output, don’t forget to select the correct function mode in the Output Panel: Arbitrary, Sequence or Advance Sequence.
For More Information
For more of Tabor’s solutions or to schedule a demo, please contact your local Tabor representative or email your request to [email protected].