Introduction to the Pulse Composer
To create complex pulses and pulse trains, ArbConnection offers the dedicated Pulse Composer. In this three part series of tutorials, Creating Complex Pulses and Pulse Trains, you will learn all about easily creating even the most complex pulse trains, using the dedicated Pulse Composer.
The Pulse Composer is a great tool for creating and editing pulses without the need to think about sample clock, number of points and complex equations. Pulses are created on the screen, simply and efficiently in a special dialog box, by simply typing in the amplitude and time duration. In this tutorial we will get acquainted with the pulse composer and its components.
Once you have opened ArbConnection, to launch the Pulse Composer simply point and click on the Pulse tab in the Panels bar under the Composers group.
 Figure 1 - Launching The Pulse Composer
The Pulse Composer has 3 main sections:
- Pulse composer screen.
- Menu bar.
- Toolbar.
1. The Pulse Composer Screen
The Pulse composer screen has two axes – vertical and horizontal. The vertical axis represented the pulses amplitude in Volts units. The horizontal axis represents the pulses duration in time units. Each axis has its own scale, and this scale is displayed on the bottom left corner of the screen.

Figure 2 - The Pulse Composer Screen
2. The Pulse Composer Menu Bar
The standard Windows Menu Bar is the top bar. It provides access to File, Edit Train, View, Tools and Help commands.
2.1 File Menu
- New – This command creates a new pulse and is destructive to the displayed waveform.
- Open… - This command will let you browse through your disk space for previously saved pulse waveform files and load them to the pulse screen area. File extension that can be read to the pulse composer is *.pls.
- Save - This command will store the active waveform in your waveform generator directory with a *.pls extension.
- Save As… - Use this command the first time you save your waveform. It will let you select name, location and format for your waveform file.
- Print - With this command you may print the active Pulse Window.
- Exit - This Command ends the current Pulse Composer session.
2.2 Edit Train Menu
- Append Section - The Append Section command lets you append a new section at the end of the pulse train.
- Insert Section - The Insert Section command lets you insert a new section in between sections that were already designed.
- Delete Section – This command lets you remove the currently active section from the pulse train without affecting the rest of the train.
- Remove all Sections - This command lets you remove the entire pulse design from the pulse screen and start from a fresh page.
- Undo - The Undo command undoes the last editing operation.
2.3 View Menu
- Pulse Editor - In general, the Pulse Editor is used for placing straight line segments on the screen in intervals that define pulse width, rise/fall times and amplitude. For detailed Information on how to use the Pulse Editor go to the tutorials/remote-operation section on our website.
- Full Train - The Full Train view shows all sections of the pulse train on the pulse screen.
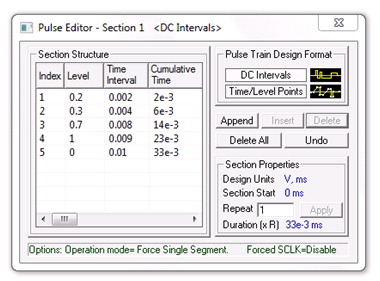 Figure 3 - The Pulse Editor
- Single Section - The Single Section view shows one section at a time on the pulse screen.
- Channel 1 - The Channel 1 view command updates the waveform screen with the Channel 1 pulse train.
- Channel 2 - The Channel 2 view command updates the waveform screen with the Channel 2 pulse train.
- Options – This command opens the dialog box as shown below. Use this dialog box to fine-tune the Pulse Composer to direct how it should deal with operational modes and the waveform memory. For a detailed Information on the Pulse Editor Options menu, go to the tutorials/remote-operation section on our website.
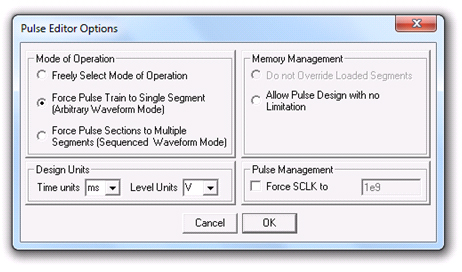 Figure 4 - Pulse Editor Options Dialog Box
2.4 Tools Menu
- Download Pulse Train – This command lets you download the Pulse train to desired channel.
- Clear Memory - You can clear the entire waveform memory using the Clear Memory command.
3. The Pulse Composer Toolbar
The toolbar contains icons for editing the waveform screen, icons for saving and loading waveforms, fields for selecting an active channel and more. The Toolbar is shown below. The icons, from left to right, operate the following functions:
- New waveform.
- Open an existing waveform file.
- Save pulse train.
- Save pulse train as.
- Print the screen.
- Open the Pulse Editor dialog box.
- Current view on the screen.
- Download the displayed pulse train to the active channel.
- Clear the memory.
- Show Channel 1 or Channel 2 waveforms.

Figure 5 - The Pulse Composer Toolbar
Now that we are familiar with the Pulse Composer, we can learn more on how to create a Full Pulse Train using the Pulse Editor. For detailed Information on how to use the Pulse Editor read the next tutorial in this series, Creating Complex Pulses and Pulse Trains Part 2 - How To Use The Pulse Editor.
For More Information
For more of Tabor’s solutions or to schedule a demo, please contact your local Tabor representative or email your request to [email protected].