Using The Wave Composer Equation Editor
One of the most powerful features of the ArbConnection software, and probably the feature that will be used the most, is the Equation Editor. The Equation Editor lets you write equations the same way you would do on a blank piece of paper. The equations are then translated to sequential points that form waveforms and are displayed on the waveform screen. The Equation Editor will detect and inform you on syntax errors and, with its self-adjusting feature, will automatically adjust your parameters so that none of the points on your waveform will exceed the maximum scale limits. In this tutorial, the second in the series of tutorials, Creating Waveforms and Sequences, you will see the capabilities of the Equation Editor and learn how to use it.
When you invoke the Equation Editor, a dialog box appears as shown in figure 1.
 Figure 1: The Equation Editor Dialog Box
The Dialog box has various parameters and fields
- Anchors - Define the start and end points from which the equation will be generated. The equation can be limited to a specific time scale by moving the anchor points from their default locations.
- Waveform Amplitude - The vertical axis of the Wave Composer represents 16-bits of vertical resolution. That means that the equation is computed, resolved and generated with 1/16384 increments and accuracy.
- Cycles - Defines how many waveform cycles will be created within the specified start and end anchor points.
- Level Adjuster - The Level Adjuster mode does not interfere with your calculations and displays the waveform as computed from your equation. If you check the Auto-scaling box or the Scale option, whenever you change the Max and Min setting in the Waveform Amplitude fields your waveform amplitude will be scaled automatically. If the Original option is checked then the waveform will not be scaled automatically.
- Equation - You will be using the Equation field for writing your equations. For information on Equation syntax and conventions click on the button
 in the top right corner. Insert Wave button allows you to open a previously saved waveform which you would like to use in your equation.
The History Group contains three buttons:
• Save - to save your equation for future use.
• Open - provides access to previously saved equations.
• Clear - clears the history of the equation field.
- Aliases - This feature lets you define expressions or stored waveforms with Aliases. The Aliases table contains an index column for the number of aliases defined, an Alias column and an expression column that corresponds to the given alias.
- Control Buttons - There are four control buttons at the right corner of the dialog box.
• Preview button to preview an image of your equation.
• OK button to place your waveform on the waveform screen and to leave the dialog box on the screen.
• Default button restores the parameters in the equation editor to their original factory default values.
• Cancel button will remove the dialog box from the screen.
1. Writing Equations
Equations are always computed as a function of the vertical (Amplitude) axis therefore the left side of your equation will always look as ‘Amplitude(p)=’, where ‘p’ is the equation variables in units of waveform points. You can write equations with up to 256 characters. If the equation is too long to fit in the visible field, parts to the left or right will scroll off the ends.
1.1 Equation Convention
Equations are written in conventional mathematical notation. The only limitation is that the equation must be of a single variable that is directly related to the current horizontal axis setting. Spaces are ignored. All calculations are done with double-digit precision. For the trigonometric functions, all angles are expressed in radians.
1.2 Equation Examples
1.2.1 Adding straight line equation to a sine wave equation:
In the Equation edit field enter:
Amplitude(p)=12000*sin(omg*p*l0)-8*p+4000
Press [Preview]. Your screen should look like Figure 2 below:
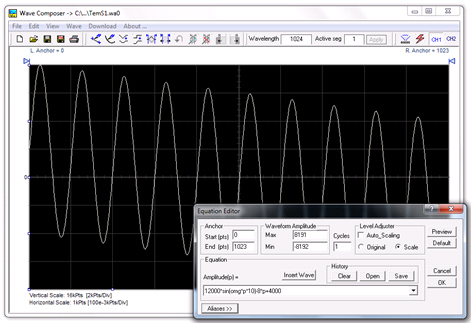
Figure 2: Adding straight line equation to a sine wave
1.2.2 AM Modulation:
In the equation field enter:
Type: Amplitude(p)= 12000*sin(omg*p)*cos(omg*p*30)
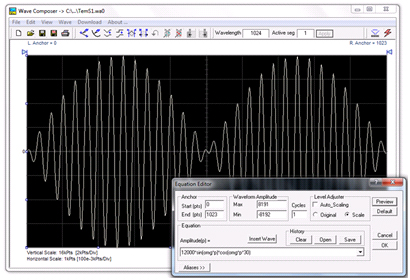
Figure 3: AM Modulation of a sine wave
1.2.3 Adding two different sine waves:
In the equation field enter:
Amplitude(p)=24000*sin(omg*p)+4500*sin(2*omg*p)
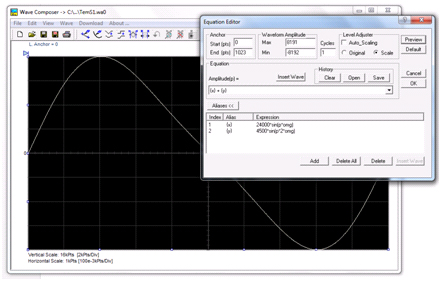
Figure 4: Adding two different sine waves
1.2.4 Exponentially Decaying Sinewave:
Use the following equation:
Amplitude(p)=12000*sin(omg*p*10)*e^(p/(-250))
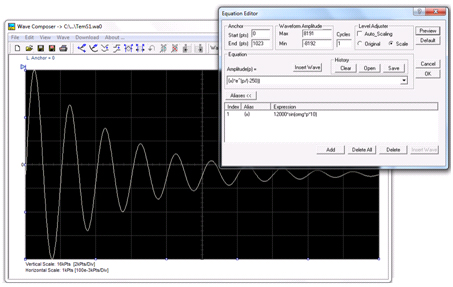
Figure 5: Exponentially Decaying Sine wave
2. Combining Waveforms
Using the equation editor, you can create combinations of several waveform files, which you previously stored on your hard drive. You can apply mathematical expressions on/with waveform files.
- Example how to generate amplitude-modulated waveform with added noise
1. In the Wave command menu select Sine to create a sine waveform. Press OK and then select the Save Waveform As… from the File command. Save this file using the name Sine.wav. Note where you store this waveform as you need to know the path for the next step.
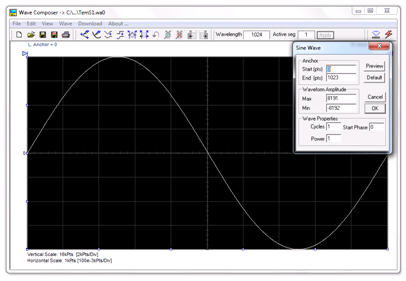
Figure 6: Creating a sine wave file
2. From the Wave command select Noise. The Waveform amplitude can be set to decrease the noise level. Click OK and watch your waveform screen draw a noisy signal. From the File menu select Save Waveform As… and save this waveform using the name Noise.wav.
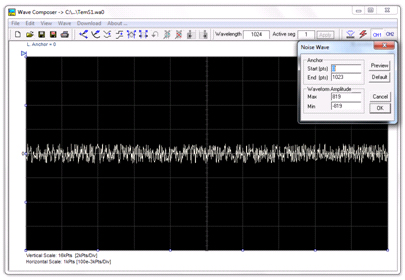
Figure 7: Creating a noise file
3. Open the Equation Editor. In the Equation field write the following equation using the insert wave command:
Amplitude(p)= c:/Sine.wav*sin(omg*p*5)+c:/Noise.wav
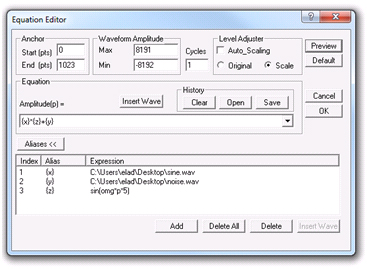
Figure 8: Combining files using the equation editor
Press the OK button. Your waveform screen should look as shown below:
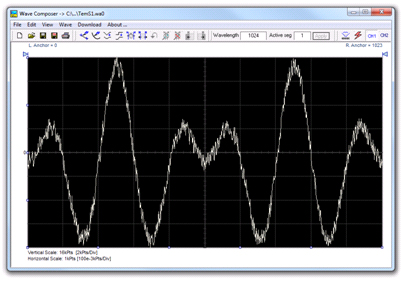
Figure 9: Noisy AM modulated sine signal
In the first 2 parts of this tutorial series, you learned how to create arbitrary waveforms using the Wave Composer. Read the third and final part, Creating Waveforms and Sequences – How To Simply Generate A Sequence, to learn how to generate a sequence with your arbitrary waveforms.
For More Information
For more of Tabor’s solutions or to schedule a demo, please contact your local Tabor representative or email your request to [email protected].