How To Use The Wave Composer
In order to truly tap into the full power of your Tabor waveform generator, you need to be able to easily design, create and load waveform and sequence data. This three part series of tutorials, Creating Waveforms and Sequences, is intended to help you learn how to use ArbConnection and the Wave Composer to get the most out of your Tabor AWG.
The Wave Composer is an editorial tool that is part of ArbConnection. It enables dividing the memory into different segments and loading each segment with a different waveform. With it you can easily create waveforms using drawing tools, built-in libraries and mathematical equations. It can also import waveform coordinates from other programs, such as Matlab, Excel or from captured waveforms from oscilloscopes, and use them directly as waveform data. The Wave Composer is loaded with many features and options so use the following document to learn how to create, edit and download waveforms to your Tabor waveform generator using the Wave Composer.
Once you have opened ArbConnection, to launch the wave composer simply point and click on the Wave tab in the Panels bar under the Composers group.
Note
You can design your waveforms and sequences in offline mode without connecting to an instrument. However, in this series of tutorials we will assume that ArbConnection is online and connected to a WX2184C.
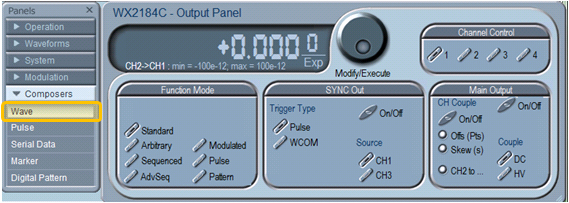
Figure 1 - Launching Wave Composer
The Wave Composer has 3 main sections:
- Waveform screen
- Menu bar
- Toolbar
1. The Waveform Screen
The waveform screen has two axes – vertical and horizontal. The vertical axis represents the instrument’s vertical or DAC resolution. For example, the WX series has a 14 bit DAC and so the axis is labeled from -8192 through 8191 for a total of 16384 points. The horizontal axis, represents the number of points (or wavelength) of the selected segment, by default this is 1024 points (from point 0 to 1023). This number can be changed using the Wavelength field in the Toolbar. Note, the wavelength must meet the minimum, maximum and resolution limitations depending on your instrument and the memory option installed. You can change the number of the segment you are creating/editing by changing the active segment field. Remember to click on the Apply button once any changes were made.
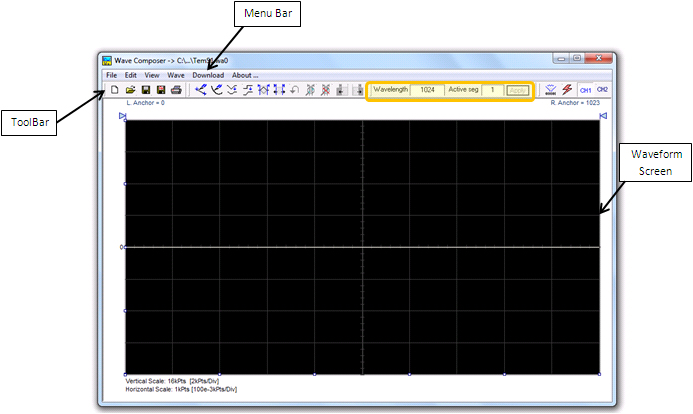
Figure 2 - The Wave composer
2. The Menu Bar
The Menu Bar provides access to standard Windows commands such as File and View. In addition, there are ArbConnection-specific commands such as Edit, Wave and Download.
2.1. File Menu
- New Waveform - The New Waveform command creates a new waveform and is destructive to the displayed waveform.
- Open Waveform… - This command is very useful for converting waveform files to a format that is acceptable by the Wave Composer. The Open Waveform command can convert ASCII. *CSV (comma delimited text), *PRN (space delimited text), *txt and two Lecroy formats *trc and *.0*. The file that is opened is automatically converted to *.wav format.
- Save Waveform - The Save Waveform command will store your active waveform in your waveform generator directory as a binary file with an *.wav extension.
- Save Waveform As… - will let you select name, location and format for your waveform file.
- Print - With this command you may print the active Waveform Window.
- Exit - The Exit command ends the current Wave Composer session.
2.2. Edit Menu
- Autoline - Lets you draw straight-line segments. Right click on the mouse button to terminate this operation.
- Sketch - Lets you draw free-hand segments.
- Smooth - Lets you smooth-out rough transitions on your waveform. Place the anchors on the left and right of your waveform segment and select the Smooth command.
- Filter - The Filter used with this command is moving average. This is done by recalculating each point as an average of symmetrical number of adjacent points. Place the anchors as boundaries on the left and right of the selected segment.
- Invert - Lets you invert entire waveforms, or marked segments of waveforms.
- Trim Left - The trim left command lets you trim waveforms to the left of the anchor point.
- Trim Right - The trim right command lets you trim waveforms to the right of the anchor point.
- Unmark - The unmark command resets the anchor positions to point 0 and the last waveform point.
- Undo - The Undo command undoes the last editing operation.
2.3. View Menu
- Zoom-In - The zoom-in command operates between anchors. Anchors are marked as left and right hand triangles.
- Zoom-Out - The zoom-out restores the screen to display the complete waveform.
- Channel 1/ Channel 2 - Updates the waveform screen with the Channel 1/2 waveform.
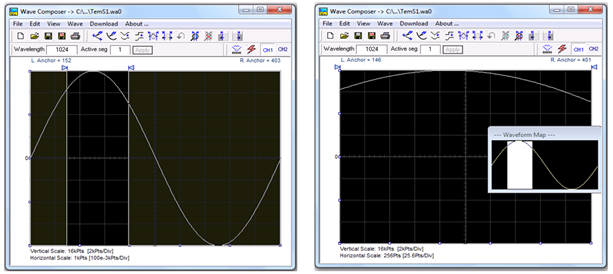
Figure 3 - Waveform Zoom, the right image is a zoom in of the area shown in the left image.
2.4. Wave Menu
The Wave Commands let you create waveforms on the screen. The Wave command has a library of 9 waveforms: Sine, Triangle, Square, Sinc, Gaussian, Exponent, Pulse, Noise, DC, PWM and cardiac ECG. It also lets you create waveforms by invoking the Equation Editor.
2.4.1. Creating Waveforms from the Built-in Library
Use the following procedure to create sine waveforms from the built-in library. Click on Wave, and then Sine, the dialog box as shown below will appear. You can now start programming parameters that are available in this box:
- Start Point – Defines the first point where the created waveform will start.
- End Point – Defines where the created waveform will end.
- Cycles – The Cycles parameter defines how many sine cycles will be created within the specified start and end points.
- Amplitude – 14-bit of vertical resolution define 16,384 incremental steps. The Amplitude parameter defines how many of these steps are used for generating the waveform.
- Start Phase – The Start Phase parameter defines the angle at which the sine will start.
- Power – Determine the power of the sine:

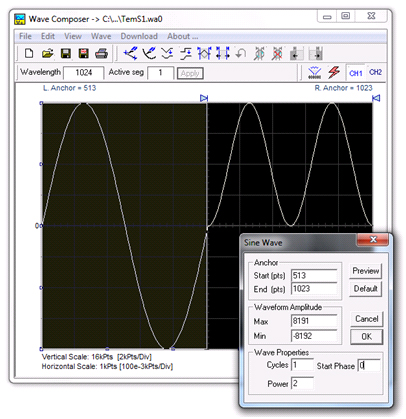
Figure 4 -Constructing different waveforms using the Anchors and wave properties
2.4.2. Equation Editor
One of ArbConnection’s most powerful features, and probably the most useful, is the Equation Editor. The Equation Editor lets you write equations the same way as you would on a blank piece of paper. Just write it and ArbConnection processes the mathematical expressions and converts them into waveform coordinates displayed on the waveform screen.
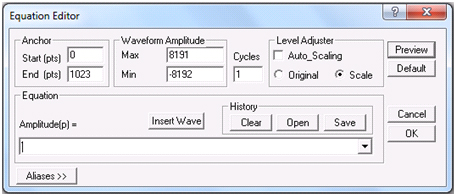
Figure 5: Equation editor dialog box.
For detailed information on how to use the equation editor refer to Part 2 of this tutorial series.
3. The Toolbar
The Toolbar contains icons for editing the waveform screen, icons for saving and loading waveforms, fields for selecting an active channel and for adjusting segment length and more. For the commands shortcut icons, refer to the Edit commands descriptions above.
First set the channel number you wish to export the waveform to. Once you created your waveform click on 
 to download the waveform you created to the instrument. Click on
  to clear the memory of the current channel.

Figure 6 - The toolbar
Now that you have gotten acquainted with the Wave Composer and how to use it, read the next tutorial, Creating Waveforms and Sequences Part 2 - Using the Wave Composer Equation Editor, to learn how to create even more complex arbitrary waveforms.
For More Information
For more of Tabor’s solutions or to schedule a demo, please contact your local Tabor representative or email your request to [email protected].