How To Simply Design a Pulse Train
Following the first 2 parts of the tutorial series: Creating Complex Pulses and Pulse Trains, you should now be familiar with the terms used for the pulse design, and with the Pulse Editor and its options. In this last tutorial of the series we will demonstrate, step by step, how to create a four sections pulse train as shown below:
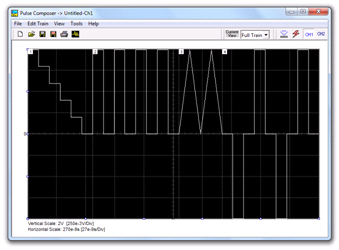 Figure 1 - Pulse Train
1. Building The Pulse Train
To start the example, you should open the pulse composer. A blank screen will show up.
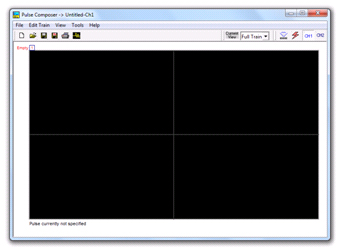 Figure 2 - Invoking the Pulse Editor
1.1 Pulse Train - Section 1
The first section of the pulse train we will construct is shown below. First, Point and click on the New icon and next, click on the Pulse Editor icon . Choose DC intervals then type in the level and time intervals as shown below. Note that the pulse segments are being created on the screen as you type the values.
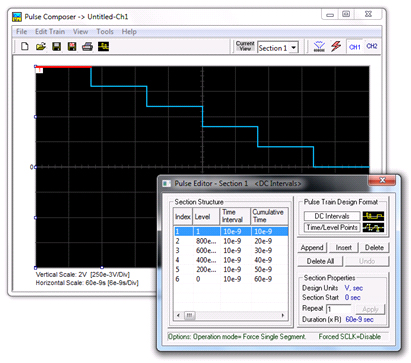 Figure 3 - Section 1 of the pulse train
Before proceeding with the design of the next section, pay attention to some values that are now available on the Pulse Composer screen. On the left bottom corner of the composer:
- Vertical Scale - showing 2 V (250e-3 V/Div).
- Horizontal Scale - showing 60e-9sec (6e-9sec/Div).
These two values are critical for the integrity of the design, because they are later being interpreted by the program and converted to waveform coordinates, that the generator can process and output as a pulse shape. These values may change as you add more sections to the pulse train.
1.2 Pulse Train - Section 2
After the first pulse section is complete, point and click on the Edit command and select the Append Section option. A new section number will appear, but it will appear empty next to the section identifier. You are now ready to start programming values. Type the section entries as shown in the figure below.
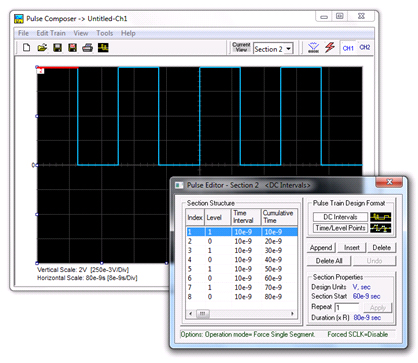 Figure 4 - Section 2 of the pulse train
1.3 Pulse Train - Section 3
The second pulse section is complete. We are ready now to start building the third section of the pulse as shown in the figure below. Point and click on the Edit command and select the Append Section option. A new section number will appear, but it will show empty next to the section identifier. Note that there are linear transitions required first. Therefore, select the Time/Level Points option in the Pulse Train Design Format. In case you made a mistake and want to switch design formats after typing in some values, the Pulse Editor will show an error, alerting you that design format can only be changed for the empty section. In this case, the only way to recover is to delete all entries and start from an empty index list.
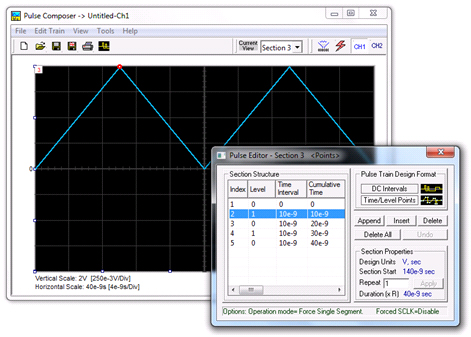 Figure 5 - Section 3 of the pulse train
1.4 Pulse Train - Section 4
The third pulse section is complete. We are ready now to start building the forth section of the pulse as shown in the figure below. Point and click on the Edit command and select the Append Section option. A new section number will appear and will show empty next to the section identifier. Before you start entering values to this section, note that there are fast transitions required for this section. Therefore, select the DC Intervals option in the Pulse Train Design Format. You are now ready to start programming values. Type the section entries as shown in the figure below.
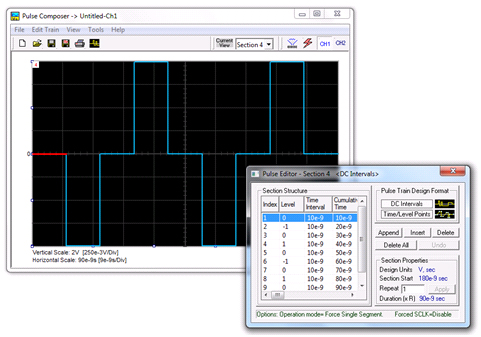 Figure 6 - Section 4 of the pulse train
2. Downloading The Pulse Train
If you followed the above description on how to build this pulse example, the screen should look exactly as shown below.
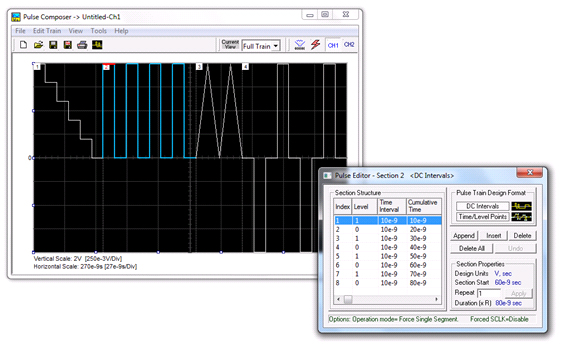 Figure 7 - Entire Pulse Train
If you are pleased with the results, the next step is to download what you see on the Pulse Composer screen to the generator. One more step before you download the waveform to the instrument is to check the Pulse Train Download Summary as appears after you press the Download icon  . You can also view the same information if you select it from the View menu. Refer to the figure below for information on how to interpret your download summary.
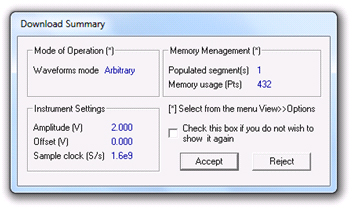 Figure 8 - Download Summary
3. Interpreting The Download Summary
It is very important to understand that when you download a pulse waveform from the Pulse Composer, parameters and mode of operation may change settings on your generator. The download summary shows what will change and allows you to reject the new settings if you do not agree to the changes. Once you press the Accept button, the waveform will be downloaded to the generator and the modes and parameters updated as shown in the dialog box. If you are already familiar with the changes and do not care to see the download summary every time you download a pulse waveform, you can check the box and it will not be shown on your next download.
- Mode of Operation – This describes the new setting of the operating mode. This field could display one of two options: Arbitrary or Sequenced.
- Memory Management – By selecting the Arbitrary mode of operation, the pulse train is forced to a single segment. This summary shows which segment has been populated and how much memory was used to build the required pulse train.
- Instrument Settings – Shows the amplitude, offset and sample clock settings that will be changed on the generator. The settings in this summary cannot be affected from the Pulse Editor options settings. These are being computed and modified specifically for the current pulse train pattern and will change from pattern to pattern.
- Accept/Reject – These buttons are the final step before you download the pulse train to the instrument.
For More Information
For more of Tabor’s solutions or to schedule a demo, please contact your local Tabor representative or email your request to [email protected].